macOS is the new name of Apple’s desktop and server operating system for Macintosh computers. The new macOS Sierra 10.12 focus on Continuity, iCloud, and windowing, as well as support for Apple Pay and Siri.
However, there are not all advances in macOS Sierra. The feature to use Disk Utility to burn DVDs is removed from macOS 10.12 Sierra. Now one can only burn disk images and data discs from the Finder or from the command line on macOS Sierra. You can no longer burn video DVDs playable from Disk Utility.
So, burning DVD on macOS Sierra will be a headache since your DVD burning apps may not work on macOS Sierra and Disk Utility is not provided any more. Want to burn DVD on macOS Sierra for playing on DVD player or TV? Haven’t got away? In this article, you’ll learn how to create DVD from videos on macOS 10.12 Sierra effortlessly.
Actually, what you need is a DVD Creator/Burner for macOS Sierra. Make sure it accepts most regular video formats so that you don’t need to worry about the video compatibility. Here macOS Sierra DVD burning program – Xilisoft DVD Creator for Mac is highly recommended to help you burn videos in any regular formats like MP4, MOV, FLV, AVI, WMV, M4V, MPG, 3GP, M2TS, VOB, MXF, HEVC, YouTube etc. to DVD disc formats (DVD-R, DVD+R, DVD-RW, DVD+RW, DVD+R DL, DVD-R DL, DVD-5 and DVD-9) on macOS 10.12 Sierra without any troubles.
Key Features
Burn HD/SD Video to DVD: Convert and burn HD/SD videos such as MKV, TS, MXF, MP4, AVI, WMV, MOV, MTS, and M2TS to DVD on macOS Sierra
Camcorder videos to DVD on macOS Sierra: Use this useful DVD Creator to create DVD movies from videos taken by iPhone, other smartphones as well as DVs.
Support DVD Disc Formats: Supports popular DVD disc formats (DVD-R, DVD+R, DVD-RW, DVD+RW, DVD+R DL, DVD-R DL, DVD-5 and DVD-9).
Convert Videos in All Formats: Easily and fast convert popular video formats like H.264, AVI, MPEG, WMV, DivX, MP4, DV, VOB, iPhone videos (MOV) and burn to DVD.
Customize Menu & Chapter: Attach background music or picture, menu title or opening film clip to menu; Set a clip from the video and attach it as video thumbnail in DVD menu; Customize chapter to personalize DVD movie.
Clip and Join Videos: Clip your favorite sections of a video or merge several video collections to create DVD movie as you want.
Add Audio Track and Subtitle: Create DVD movie with multiple audio tracks and subtitles. Supported all audio formats and up to 32 subtitle files (.srt). Adjust the volume, audio delay and loop options, set subtitle language, font.
Adjust DVD Settings: Set TV Standard between NTSC and PAL, choose aspect ratio between 16:9 and 4:3, and set video quality to highest.
Fully compatible with macOS 10.12 Sierra, 10.11 El Capitan, 10.10 Yosemite, 10.9 Mavericks, 10.8 Mountain Lion, 10.7 Lion and 10.6 Snow Leopard.

 >>Buy DVD Creator for macOS 10.12 Sierra
How to Burn Video MP4, MOV, MKV, AVI, FLV, WMV, MXF, etc to DVD on macOS Sierra?
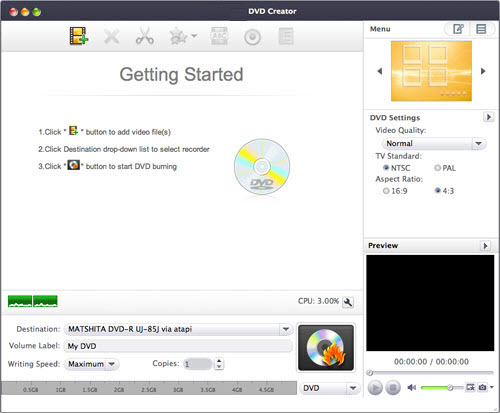
Step 1: Install and run the DVD Creator for macOS 10.12 Sierra
After installation, run the macOS 10.12 Sierra DVD burning software. You can see the main interface as below.
Step 2: Add files
Click the “Add Video File(s)…” button on the toolbar, select one or more files in the “Add Video File(s)” dialog box that appears, and then click “Open” to load the selected files into the file list of the program.
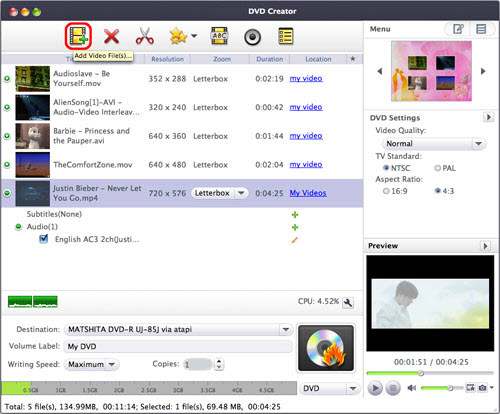
Tip: You can choose “File > Add Video File(s)…” or “File > Add Video Folder…” from the main menu to load video(s).
Step 3: Add subtitles and audio tracks
After loading a video file, its subtitle and audio track information will be listed under the file node in the file list.
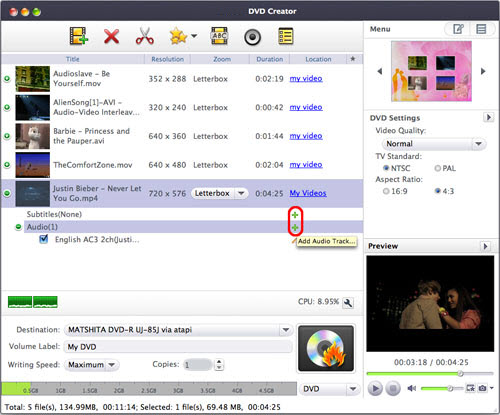
To add subtitles, click on the “+” sign (“Add Subtitles…”) on the right of the subtitle item to load the required subtitle file(s) from your computer.
To add audio tracks, click on the “+” sign (“Add Audio Track…”) on the right of the audio track item to load the required audio track(s) from your computer.
Step 4: Create a DVD menu
Click on the “Templates” button from the “Menu” panel in the top right-hand window and choose a template from the list to quickly create a simple DVD menu.
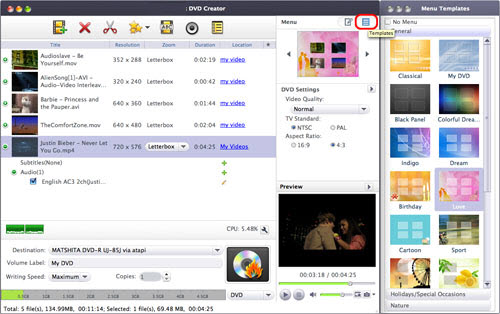
Tip: You can adjust DVD settings (e.g. “Video Quality”, “TV Standard”, “Aspect Ratio”) in the right settings panel. Click “Edit” button to open the “Settings” window for more settings.
Step 5: Set output target
Click the “Destination” drop-down button from the main window, and choose DVD disc, DVD folder, or ISO image file from the drop-down list as the output target.

Tip: If you set the output target as DVD folder or ISO image file, you can change the target path to save the output file.
Step 6: Set DVD name
Enter a name in the “Volume Label” field from the main window to name the output DVD disc, DVD folder, or ISO image file.
Tip: If you set the output target as DVD folder or ISO image file, you can change the target path to save the output file.
Step 7: Start creating/burning dvd on macOS Sierra 10.12
Choose the write speed and the number of copies required, and then click “Burn” to start the macOS Sierra DVD creating/burning process.
