
“How can I install Quicktime player to Windows 10? I just did the Win 10 update on my Laptop and I chose the erase everything option so it would be a clean install. After the update I wen to Apple to download quicktime so QT is installed before I install PP and the other CC apps. I recevied a QT error message stating that QT can only run on Win 7 or Vista. WOW!”
QuickTime is an extensible multimedia framework developed by Apple Inc., capable of handling various formats of digital video, picture, sound, panoramic images, and interactivity on Mac OS X. After a couple of preview Windows releases, Apple released 7.0.2 as the first stable release on September 7, 2005 for Windows 2000 and Windows XP. And now Windows 10 is an entirely new version of the veteran Windows operating system by Microsoft. The latest Windows 10 system, is no longer just an operating system for 32-bit and 64-bit PCs, but also run on the ARM platform for smaller tablets and smartphones. However, when trying to install the latest Quicktime v7.7.9, Quicktime 7.7.8 or Quicktime 7.7.7 can’t be installed on Windows 10 build 10166, running the compatibility troublrshooter, been told that this is the incompatible program. However, QuickTime 7.7.6 could be installed successfully under Windows 10 build 10166.
So How to solved the QuickTime can’t be installed in Windows 10 issues?
The latest QuickTime 7 is incompatible with Windows 10, so how to solved this incompatible issues, please keep reading and UFUShare provide two methods for installing QuickTime in Windows 10.

Methods 1: Download the older versions of QuickTime (previous to 7.7.7) on Windows 10
UFUShare searched many forums, on different forums, it’s been told that older versions of QuickTime (previous to 7.7.7) might work on Windows 10. If you are using Windows 10 and see a warning that it’s not possible to install QuickTime on your system, please try downloading QuickTime 7.7.6 for Windows here.
Methods 2: Download the older versions of QuickTime (previous to 7.7.7) on Windows 10
- Download QuickTimeInstaller.exe from the official QuickTime for Windows page. (Google it if the link is dead).
- To make things easier, save the file in a folder like C:\QT or something similarly easy. It can be deleted after we’re finished.
- Open the folder you downloaded it to in Windows Explorer.
- Right-click the file and choose “Extract here”
- Download this TRANSFORM file and extract it to the same folder (I zipped it). We will use this file to temporarily remove the OS checks preventing the installation. (More details? Ok: a “transform” file or “.mst” is just a simple file that adds or removes things from an MSI-based installation (like QuickTime.msi).
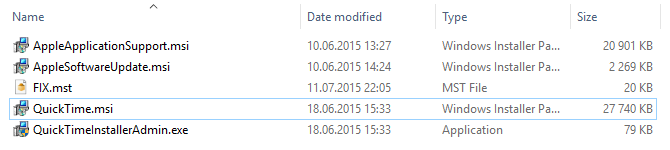
- You should now have a folder that looks something like this, under C:\QT or whichever folder you chose.
- First, we need to install the easy prerequisites:
- Double-click the AppleSoftwareUpdate.msi file and click “OK”, “I accept” etc. until the install finishes.
- Do the same with AppleApplicationSupport.msi.
- Just ignore the file called QuickTimeInstallerAdmin.exe as we won’t be needing it!
- Now, QuickTime.msi is the culprit that won’t be installed… So here’s what we do to fix that:
You now have TWO alternatives:
ALTERNATIVE 1 – manual install without transform file:
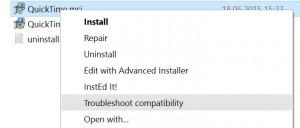
Right-click the QuickTime.msi file inside the folder you extracted the QuickTimeInstaller.exe file to earlier.
- Select “Troubleshoot compatibility”
- Wait for the wizard to scan the QuickTime.msi file for possible culprits (which we already know to be the Windows version check).
- It should say that it has applied a “Skip Version Check” workaround to enable the QuickTime.msi installer to run.
- Click “Test the program” and run the installation. Then click “Next” and complete the installation.
- If it worked without error, you’re now done! If not, try the second method at point 11 below. Or if all else fails, try the custom installer from the link you should find in the comments at the bottom, below this article.
ALTERNATIVE 2 – manual or deployment install with transform:
Click the Windows icon or Search icon and search CMD. Right-click the Command Prompt shortcut/icon and choose Run as administrator.

- In the Command Prompt window, type CD C:\QT to go to the folder where the installation will be run from.
- Type the following command and hit ENTER:
msiexec /i QuickTime.msi /qn TRANSFORMS=FIX.mst ALLUSERS=1 /log C:\QT\install.log - Installation shouldn’t take more than a couple of minutes…
- NOTE: A log file called install.log will be created in the C:\QT folder, which should end with something along the lines of “Return code 0”. If not, and QuickTime wasn’t installed, you may look in this file for any possible error codes (opens fine in Notepad or WordPad).
Tip: The Method 2 to install QuickTime on Windows 10 is from Tommy Stephansen’s post on TommyNation. Thanks a lot for his post.
