
“In GoPro studio Advanced settings can only set file format to AVI. The MOV option is greyed out. Any idea why this might be? It has always worked before. I am trying to convert 1280 x 720 100fps GoPro mp4 to 25fps MOV.”
“I edited a short film for an informal corporate training video using GP Studio. I’ve got to re-do the edit to change some titles. I did not save a GGS file when I completed the first edit and I’m not sure if the AVI files I still have are the original ones directly from my GoPro3+ because Studio app doesn’t appear to recognize them when I “import new files”. I tried to import those AVI files into Studio to re-edit my film. It doesn’t recognize them as a valid format. I don’t get an error message, but nothing happens when I browse to the files or even try to drag/drop.”
GoPro Studio software is one of the main products that are provided by the GoPro. This software has made all the things easy to do whether it is importing the GoPro media, Play back videos, viewing videos/photos or creating professional quality videos. Gopro Studio has made the video editing much easy that even beginners can edit the GoPro videos effectively. It provides a simple way to import footage, speed it up or slow it down, crop, and make image adjustments (like removing the fisheye lens distortion, or adjusting color or contrast).
GoPro Studio (formerly: Cineform Studio) is compatible with “GoPro, Canon, Nikon and other constant frame rate H.264 mp4 and .mov formats”, but what can you do if you’d like to edit videos from other cameras? Follow this guide, you can import non-GoPro videos like AVI, MKV, WMV, FLV, MXF, MTS, M2TS, iPhone Videos, DJI Videos, etc to GoPro Studio for editing in Windows/Mac, as well as solve some MP4, MOV files fail to import to GoPro Studio issue in Windows/Mac.And you can learn how to import and edit videos with GoPro Studio.
Part 1: How to Convert Videos to GoPro Studio Compatible Format?
Step-by-step to convert any video AVI, MKV, MOV, MP4, WMV, FLV, MXF, MTS, M2TS, iPhone Videos, DJI Videos, etc to H.264 MP4 to import to GoPro Studio in “Step 1: Import & Convert”. Due to codec issue, some MP4 or MOV files fail to import to GoPro Studio, you can also follow the guide to reconvert your files to GoPro Studio MP4.
Download Video to GoPro Studio Converter


Step 1. Load AVI, MKV, MOV, MOV, FLV, iPhone Video, DJI Videos, etc to this Software
As soon as you download and install this software well, open the program successfully, then you can import AVI, MKV, WMV, MOV, MP4, FLV, MXF, MTS, M2TS, iPhone Videos, DJI Videos, etc by clicking “File” >”Add video”. Best of all, you can do batch video conversion by clicking “Add from folder” button to import multiple video files.
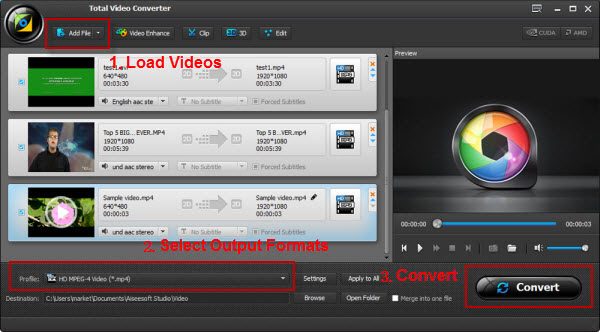
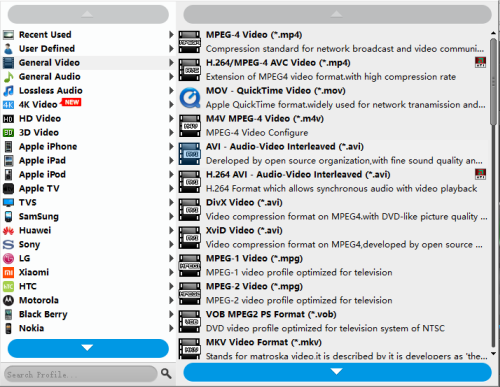
Step 2. Choose GoPro Studio Supported Formats
Click “Format”, at the format list, you can choose the proper format from the list, such as: “Common Video”>”H.264 HD Video (*.mp4)” which is supported by GoPro Studio. Of course, you can choose “HD Video” or “3D Video” and find the matched video formats you want. Best of all, GoPro Studio supports 3D video effect: Side-by-Side 3D, Over-Under 3D, Anaglyph 3D, this software all can provide for you.
TIP 1: You can click “Setting” button and enter video and audio setting window, if you are familiar with video related parameters, you can adjust video and audio parameters to GoPro Studio acceptable parameters.
TIP 2: Sect an item to activate the “Edit” menu, on the “Video Editor” Window, you can play and preview the original video and output effects. At the same time, you can flip video, trim, add special effect, adjust volume etc. All the buttons are ready for you.
Step 3. Start Video Conversion
Go back to the main interface, click “Convert” to start the AVI, MKV, WMV, MOV, MP4, FLV, MXF, MTS, M2TS, iPhone Videos, DJI Videos, etc to GoPro Studio conversion. Just wait for a while, you can get a brand new video, then you can import converted video to GoPro Studio for editing.


In Fact, this tool is so easy to study without any manual. When you are waiting the result, you can watch the video at the preview window, hope you can convert AVI, MKV, WMV, MOV, MP4, FLV, MXF, MTS, M2TS, iPhone Videos, DJI Videos, etc and edit in GoPro Studio smoothly. And then import and edit with Gopro Studio as follow.
How to Import and Edit Videos with GoPro Studio?
Step 1. Importing videos
First step for editing is importing the video files. Open the GoPro Studio and then, you will find a blue colour button on the top left corner of the window labelled as “Import New Files”. Click on that button and select the files that you want to include.
Step 2. Trimming
After you have imported the videos, cut the unnecessary portion of the videos that you are not interested to include, this trimming or cutting should be done before you start the actual editing.
For that, click on the thumbnails of the videos and then on “play”. This will result into playing the video. There are two trimming buttons on the left of the window that you can use for marking the beginning and ending of the clip which you want to include. In this way, you can select the number of videos clips that you want to include in your video.
Step 3. Changing video settings
If you want to change any setting like frames per second, size of the video, change format, increasing speed or any other setting; you can go to advanced settings and make the changes. Don’t forget to click on “remember setting” button after you have made the settings otherwise it will not save the settings that you would have made.
Step 4. Adding files to convert list
Now, you need to add the roughly trimmed files to the conversion list so that you can start with the editing. For that select the clip and then, go to “Add Clip To Conversion List”. In this way, add all the clips one by one to the list and they will appear on the right column of the GoPro window when added. In this step, you are also enabled to add the new videos, trim them at the moment and rotate them. Once you have added all the clips to conversion list, convert them by clicking on “Convert All” button.
On the completion of conversion, a pop up message labelled as “Proceed to Step 2” will appear on the screen and you need to click on that for proceeding to editing mode.
Step 5. Adding Title
Now, GoPro Studio will offer you two options; creating a totally new video or using the templates in the software. In the case you choose the second option, you need to do only one thing which is replacing the videos with the selected files.
For creating the new video, click on “Blank” button and then on “create”. Now, click on the “Title” button and type the title name that you want. You can also change the font size, colour and some other features of the title. After finalising the title, drag it to the “Drag videos here” option and if you want it to appear in the video, then you can drag it to “Drag title here”.
Step 6. Adding and Editing the video
Now, choose the video and add it by dragging and dropping to the timeline. After including the video, you can adjust the speed, fade time, brightness, volume level and many other features. You can also add the night vision feel to the video. As you have done in the importing; you can also adjust the duration of every clip that you are going to add in the video. Selecting the “Razor blade” symbol will divide the clip in two parts and if you click on “+”symbol, it will create the the fade effects in the video. The fade out effects are added so that the video will not end suddenly. So, when done with adding the clips then, add the fade out effect to the video. Click on the “Video Controls” and increase the limit on the fade out line.
Step 7. Adding music
Adding music is like adding the other features, just click on “Media” and select the audio file that you want to add. You can also recordings in your own voice.
Step 8. Exporting the video
After finishing the editing, you can export the video to the format you want. Like, you can directly upload it on the YouTube or Vimeo, save it for watching later on your PC or set other parameters by choosing the custom options. After selecting the particular option, click on the “Export” button.
Now, video editing is over and you can watch it on your smartphone, PC and even can show to your friends and family.
