
DaVinci Resolve is a valuable on set tool for logging and organizing footage. As it claimed, DaVinci Resolve allows full unlimited editing and grading of DPX, CIN, EXR, QuickTime, ProRes, DNxHD and MXF files all in real time. But things are different when we import MXF to Davinci Resolve for editing: DaVinci won’t import the Canon XF105 MXF files… What we need is to find a fast way to get around the Canon XF105 MXF Files to Davinci Resolve incompatible issue.
Based on our multiple testing, we finally work out a solution to editing Canon XF105 MXF Files in DaVinci Resolve flawlessly. In fact, it is easy, fast and worth the effort. The best way to let DaVinci Resolve work with Canon XF105 MXF clips is to convert these Canon XF105 MXF files to Davinci Resolve most compatible format like DNxHD. UFUShare Video Converter for Windows or Mac is just what you want.
Overall, it is an easy-to-use yet powerful high-quality MXF converter, player and editor. This software can deal with almost all kinds of MXF videos. With it, users can effortlessly transcode Canon XF105 MXF files for smoothly editing in DaVinci Resolve. What’s more, it can generates more optimal editing formats/codecs for you to use in different NLE apps, such as Adobe After Effects, Adobe Premiere Pro, Sony Vegas Pro, Pinnacle Studio, Windows Movie Maker and more.
 Download Video Converter for Mac:


 Download Video Converter for Windows:

How to convert and import Canon XF105 MXF files to Davinci Resolve?
Step 1. Install and launch the MXF to Davinci Resolve converter. Click the Add button to import your Canon XF105 MXF videos to the program. Checking the “Merge into one file” box allows you to merge several videos into one file.
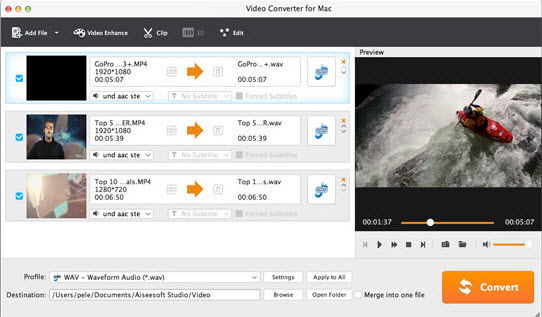
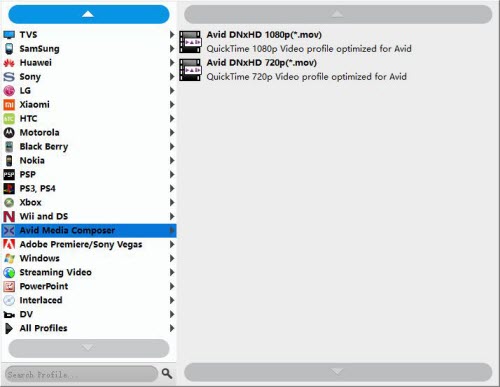
Step 2. Click the format bar and move mouse cursor “Avid Media Composer”. Here we recommend the “Avid DNxHD 1080p (*.mov)” as the best video format.
Tip: You can click “Settings” button to adjust the resolution, bitrate, etc. Just customize the parameters to meet your need.
Step 3. Click “Convert” button to start converting Canon XF105 MXF to DNxHD for importing to Davinci Resolve.
After the conversion is finished, just run Davinci Resolve and import the generated DNxHD .mov files. You will find the output video work perfectly on DaVinci Resolve.
